

Using the cloud as panic room
Time to do something about it, and also about all other scenarios that threaten your digital heritage. Can the cloud be the safe place to backup all your data? But doesn’t uploading backups to the cloud also mean that others might be able to access it? In this article we will show a disaster recovery concept that you can use to backup infinite data amounts: It is free, easy to set up, and bullet prove.
Backup vs disaster recovery
First of all we should differentiate between backups, and disaster recovery of your data. Backups ensure that nothing that is for some reason inaccessible, is lost irreversible. So for example if you accidentally delete a file, the job of your backup is to make sure that you can recover it.
Disaster recovery is a more specific term for backups. When your hard disk fails, you might still recover from your backup disk. But who tells you that the backup disk does not also fail? What in case of a nearby lightning strike that destroys all of your hardware? This question is as old as backups are. The answer is pretty simple: Unless you do not store your files in at least three geographically different places, they are not safe. This is what disaster recovery is about.
But there is also a difference in the requirements for backup drives. If you delete a file by accident, you don’t want to wait until some antique robot pulled out the data tape that contains your file. Whereas in the case of desaster recovery, this might be acceptable.
Requirements
Rule of a thumb: The safety of your data increases with the distance between the device beeing backed up and the backups.
So first of all, lets define what are our must haves for a disaster recover solution:
- Reliable storage: The solution must ensure data integrity. Imagine you need your backup after years, and your data is gone, just because the disc degenerated. Harddrives, SSDs or even optical media can not fulfill this. You need to remember to manually check and / or rewrite your data to a new disk every few years.
- Remote location: Store your backups as far away from the original machine as possible.
- Capacity: Unlimited! Limited capacity forces you to make the decission which data is important and which is not. And this decission itself introduces risk.
- Affordable: It is like with insurances, you pay for a thing that you might never need in your life. Therefore the price should be really low or even free.
Finding a safe place
Safe places for backups can be rarely found, as safety always depends on the perspective. It all can be stripped down to the basic idea: You should spread the risk of data loss as wide as possible. A good strategy is to check wether your backup location is subject to the potential hazards. This can easily be done with a small comparision matrix.
| Thread | My Computer | External drive | Cloud |
|---|---|---|---|
| Theft | ✗ | ✗ | ✓ |
| Overvoltage | ✗ | ✗ | ✓ |
| Fire | ✗ | ✗ | ✓ |
| Asteroid impact | ☠ | ☠ | ☠ |
| … |
…you got the idea.
So it might be a good idea to have a classic backup (for instant recoveries) and a “long-term” backup for desaster recovery in paralell. The former can be your USB-drive, or even better a small home server that is not connected to the same power outlets than your working machine (remember the overvoltage scenario?). While instant backups are supported very well by many tools, this is not the case for desaster backups.
Safe my data and my money
For storing backups somewhere in the cloud there are two basic options: Either you pay a few (and really only a few!) bucks, or you use the completely free options and therefore invest more time.
I personaly have choosen the first option. But the same principles and tools can also be used for the free options. Services like Dropbox or Microsoft’s OneDrive are relatively expensive when compared to the rates for raw cloud storage. This is mostly because they offer much more features than you need for a disaster recovery backup.
My choice was to use Amazon’s S3 in combination with Glacier. Their prices are as low as $0.0004 per GB / month. There are slight differences between the different regions, see their pricing overview for details. You also pay a little fee for uploading your data. The most expensive price tag is accessing your data again. In case of a disaster recovery backup that is not so important for me. If my original data and all backups are lost, I’ll be happy to pay a few dollars to get it back.
You can also use free storage locations with the tooling we are going to discuss in this article. Basically everything that is capable of holding a few bytes can be used to store your backups as well.
Use the right tools
I am a big fan of keeping things indipendant of each other. So from the very first beginning it was clear that a tool had to be used that is not related in any way to a concrete provider, or a provider specific storage solution or protocol. The tooling should also be available for all common operating systems. After a long search I found possibly the best backup tool: Duplicity.
Duplicity is a simple but mighty command line tool which is available for Linux, MacOS and also Windows. It supports just about all storage providers you can think of. It even enables you to use your IMAP mailbox to store files. The killer-feature of duplicity is that it supports client side encryption. That beeing said, you don’t need to care about data privacy anymore. In my setup I am using the following simple script to backup all my machines to S3:
#!/bin/bash

#Check preconditions
if [ $# -eq 0 ]
  then
    echo "Specify full or incremental backup type"
	exit 1
fi

#Load config
source ./BackupToCloud.conf

BACKUP_TYPE=$1
COMMONPARAMS="--exclude-device-files --file-prefix-manifest=meta_ --file-prefix-archive=data_ --file-prefix-signature=meta_ --volsize 25 --log-file=duplicity.log "

ulimit -n 1024

# Do the actual backup
duplicity $BACKUP_TYPE $COMMONPARAMS --asynchronous-upload --include-filelist exclude.txt --progress -v info \
	$SOURCE $DESTINATION | tee output.txt
You can run the script by specifying the backup type as first parameter: either full or incremental. e.g. ./backupToCloud.sh full. The script then starts to index your files and directly uploads them to the configured S3 Bucket. It slices larger files into chunks of 25 Megabytes, which saves you a lot of time in case you have to interrupt your backup. Duplicity will automatically resume your backup, starting after the last completely uploaded 25MB block.
Duplicity not only uploads your data itself, it also stores metadata like indices on the backup target. This enables duplicity to know which data is contained in each of the uploaded archives. The script shown above configures duplicity to prefix such metadata with meta_ and the data chunks with data_. In the next chapter you will see why this is so important when using glacier.
Configure Duplicty script
The configuration of the script is done via a dedicated configuration file, and by specifiying the data to be backed up in another file called exclude.txt.
# Passphrase for encryption of files
export PASSPHRASE=

# Amazon AWS Key
export AWS_ACCESS_KEY_ID=

# Amazon Secret Key
export AWS_SECRET_ACCESS_KEY=

#AWS Destination URL
export DESTINATION=s3://s3-eu-west-1.amazonaws.com/my.backup.bucket

#Root directory for backups
export SOURCE=/
The configuration file contains variables to configure a few important settings:
PASSPHRASEThis is the password with which your data will be encrypted before uploading to S3. Keep it in a safe place (not on the computer you are backing up, write it down on paper somewhere!), if you loose it, all your backups will be worthless.AWS_ACCESS_KEY_IDThe “username” of your S3 bucket userAWS_SECRET_ACCESS_KEYThe “password” of your S3 bucket userDESTINATIONThe url of your bucket, starting withs3://as protocol identifier.SOURCEThe local path where duplicity searches for the data to be backed up. In most of the cases you can leave it pointing to the root folder of your machine. The data included in the backup will be specified inexclude.txt
- **/.m2/repository**
- **/Library/Caches/**
- **/.DS_Store
- **/Development/Git_Checkouts/**
- /Users/gorootde/Downloads/**
+ /Users/gorootde/
- **
This file actually specifies what is backed up by duplicity. A + sing as first character means that an inclusion rule follows at this line, - marks an exclusion line. The rules are expressed as glob patterns. My file above does the following:
- Exclude all downloaded maven artifacts (I don’t need to backup things that are already beeing backed up on the internet)
- Exclude cache files, they are not necessary for recovery
- Meta-files like
.DS_StoreorThumbs.dbon windows can also be excluded. They only contain data that is automatically regenerated out of the other files in the backup. - I am also excluding all my git repository clones. I usually commit and push each and every single change. So my repositories are allready available as copy on github.
- Downloads, same reason as with maven artifacts.
- Include only my user’s home directory, exclude everything else
Of course my include / exclude configuration is specific for my machine and even for my habits, but it gives you a rough idea on how to configure your own personal file.
Configure S3 and Glacier
Step by step instructions how to set up a S3 bucket that automatically moves your data to glacier for reducing your storage costs:
-
Create a new S3 bucket. Include an identifier of the machine beeing backed up to this bucket. It is common to use reverse domain names to do so. e.g.
de.goroot.blog.mymacbook. -
Open your newly created bucket in the management console and click on the “Management” tab.
-
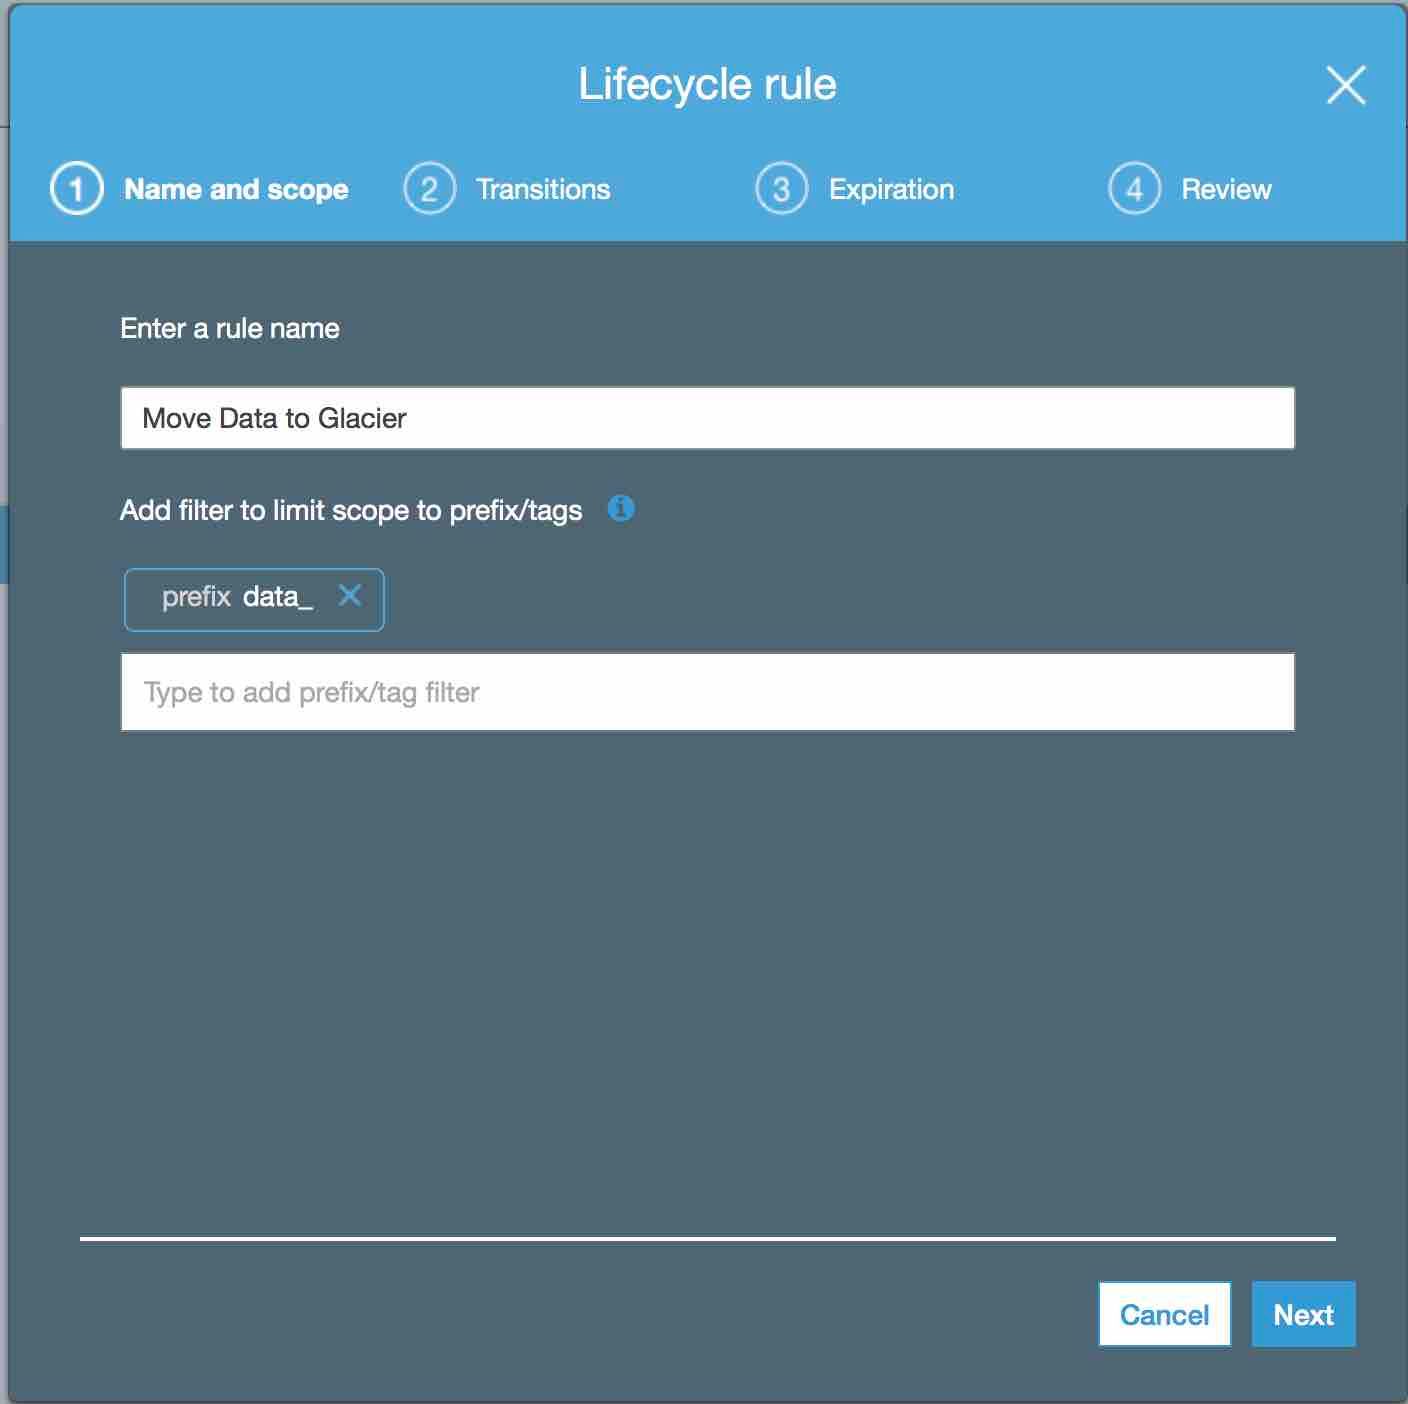
Create a new lifecycle rule name it “Move to Glacier” and set “_data” as prefix.
-
In the next step of the wizard, tick “Current version” and add the transition “Transition to Glacier after”. You can set the transition time to whatever time you like, the longer the timespan, the more you will pay the relatively expensive S3 rate. Configure S3 bucket lifecycle rule step 2
-
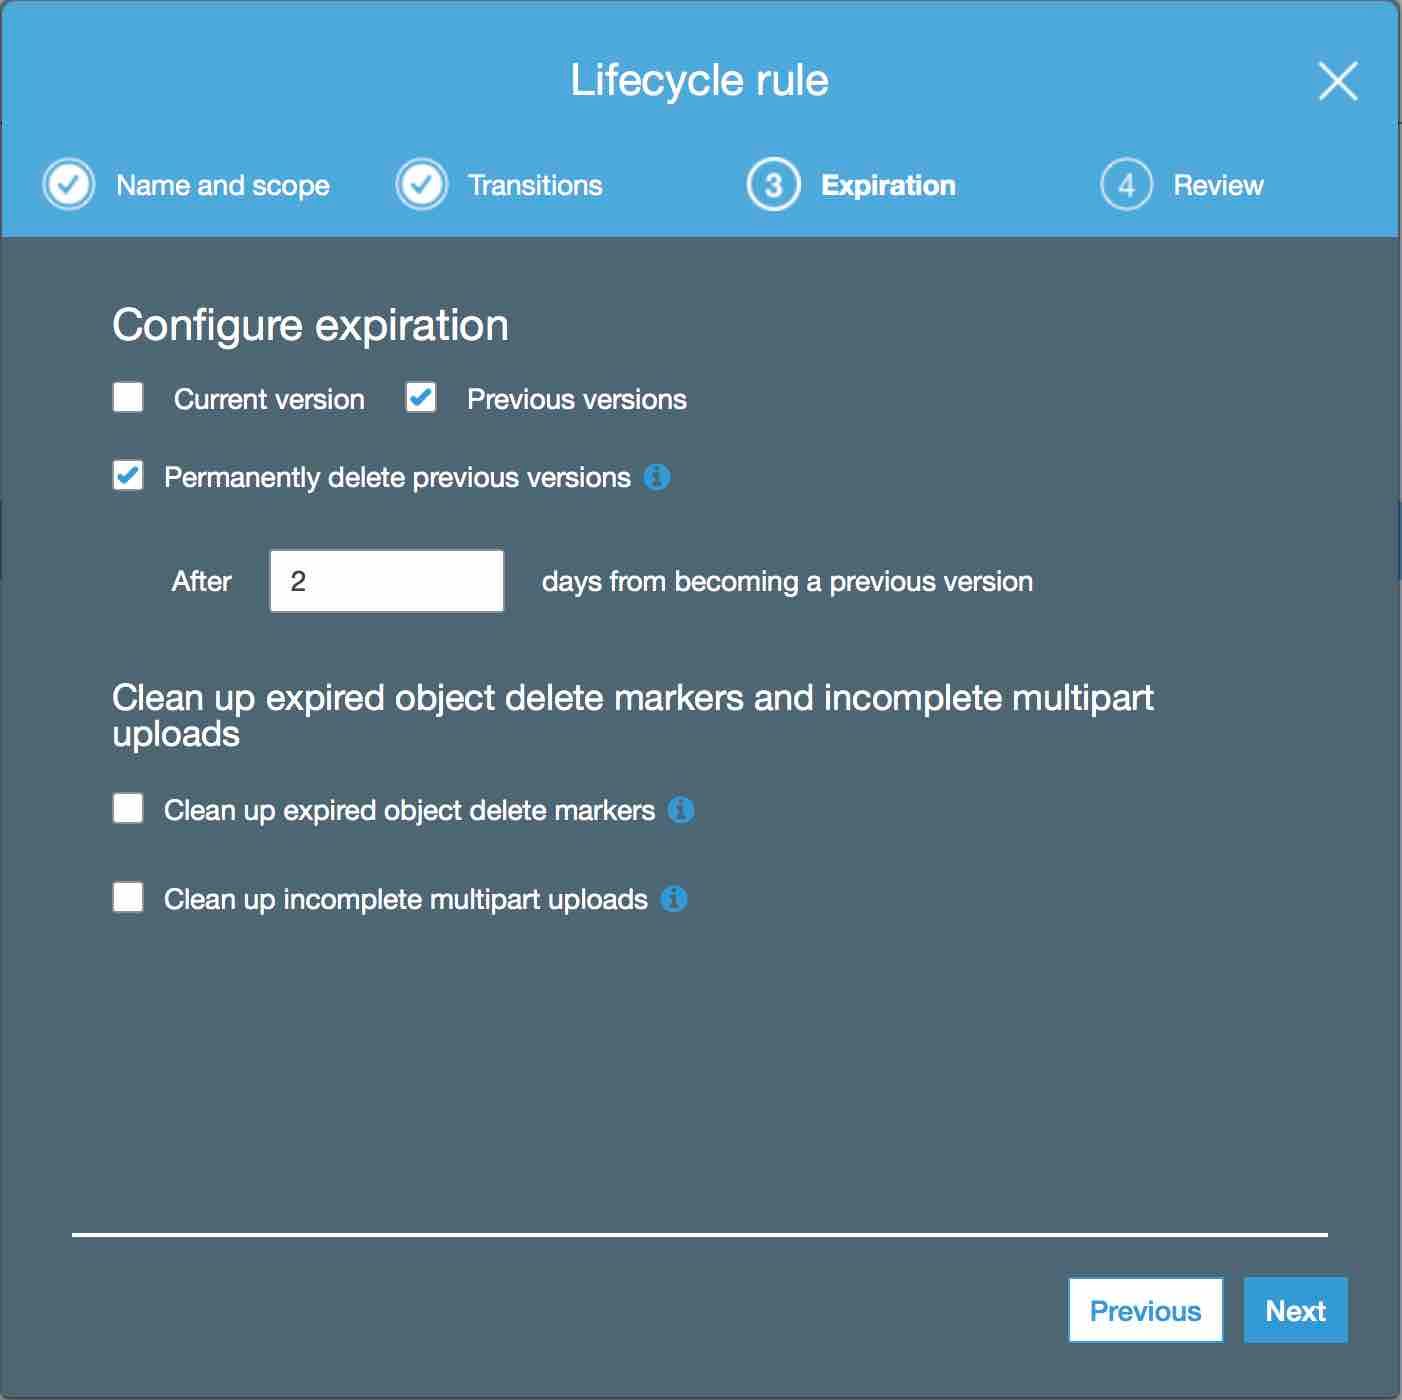
Your data is now automatically beeing moved to glacier, but we do not want to keep the same data forever on S3. Therefore we configure the rule to delete our data in our bucket.
-
Double check on the review screen that you have made the correct configuration and safe the lifecycle rule.
-
Time to configure the user for your duplicity backup script. Click on your name in the top right corner, and select “My Security credentials” in the popup menu.
-
Select “Users” in the menu on the left. Just click on the “Create User” button and create a new user with access type “Programatic access”.
-
In the permissions tab, select the “Create Policy” button
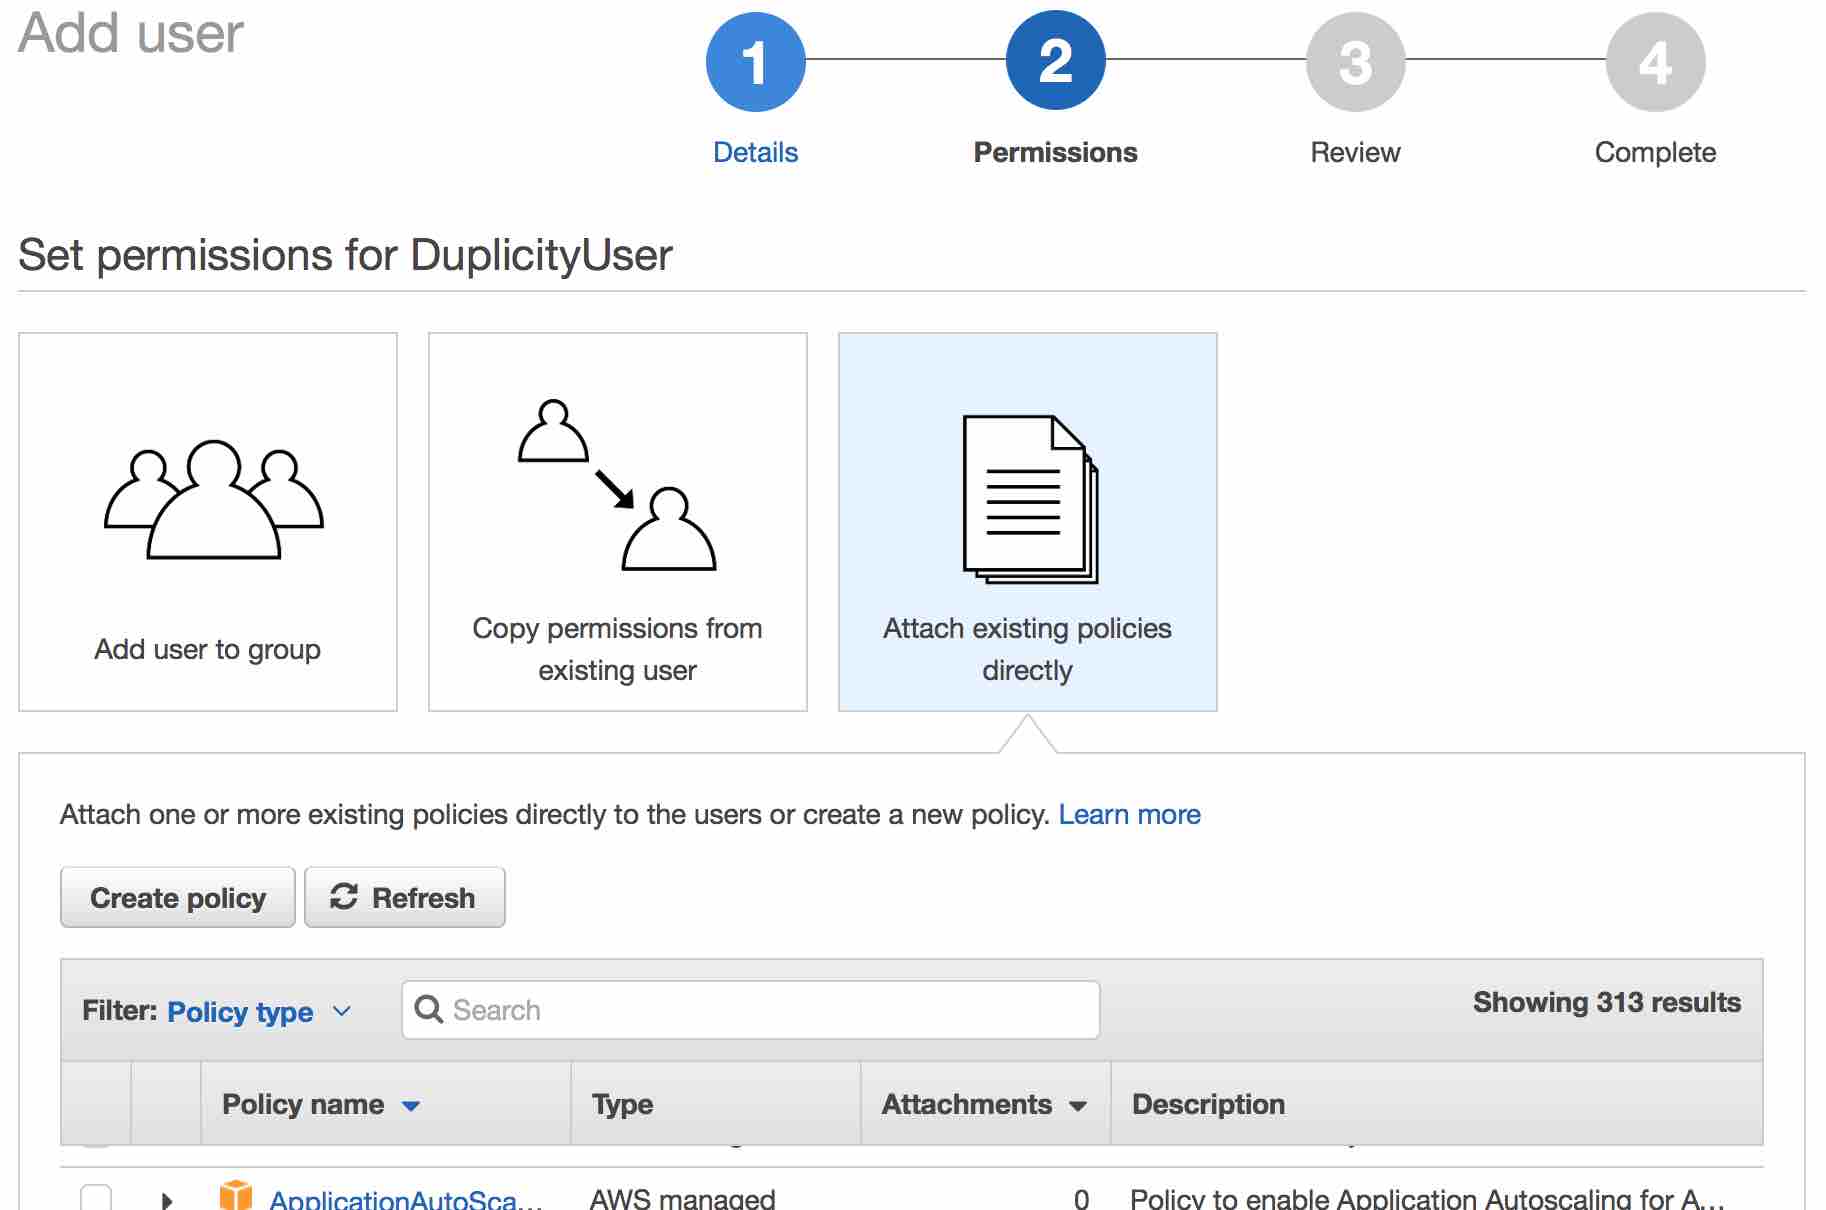 !
! -
We want to configure the policy directly by using JSON. So switch to the JSON tab and define your policy like shown below. Make sure that
de.goroot.blog.mymacbookmatches your bucket name. This policy will allow the newly created user to read and write to the given bucket. Give your policy a speaking name and save it.
{
    "Version": "2012-10-17",
    "Statement": [
        {
            "Action": "s3:*",
            "Effect": "Allow",
            "Resource": [
                "arn:aws:s3:::de.goroot.blog.mymacbook",
                "arn:aws:s3:::de.goroot.blog.mymacbook/*"
            ]
        }
    ]
}
- To complete the user configuration, create another policy with the following specification. This policy will allow your user to list all your buckets (but not access them) and therefore also find the bucket where it is allowed to write to.
{
    "Version": "2012-10-17",
    "Statement": [
        {
            "Effect": "Allow",
            "Action": "s3:ListAllMyBuckets",
            "Resource": "arn:aws:s3:::*"
        }
    ]
}
- Finally complete the user setup wizard and note down the access key ID and secret access key. You wont be able to access the secret anymore after closing this page!
- Put the access key id and secret in your
backupToCloud.conf - Setup is done, run your first backup :-)
Multiple backup sources
If you have other backup sources, simply do the steps described in the last chapter once more. My recommendation is to use a dedicated bucket with a dedicated user for each machine that you back up. In case your access key gets compromised, the possible damage is limited to the machine’s bucket.
But my bandwidth is to low to upload
No it is actually not. Even with low bandwith you can upload tons of data. Most people run some storage device 24x7 anyway. You can for example install duplicity on you existing NAS system and let the NAS upload your data. It maybe takes days or even weeks to complete the first backup, but who cares?
If you don’t run such a 24x7 machine, you can also interrupt your backup at any time and continue it later on. Duplicity will resume after the last completely uploaded chunk.
Conclusion
Using S3 is just an example, you can use any storage type supported by duplicity to backup your data. The local encryption offered by duplicity enables you to even back up to potentially “unsafe” places. I’ve heard of a guy backing up his data to a public github repository (god knows how long until they get wind of it). No need to connect your notebook to the external USB drive anymore, the backup is running in backup as soon as you are connected to your wifi. I’ve used this setup for years now, even for large environments with dozen of servers. Restore always worked perfectly fine, even it is relatively expensive to actually do it. I like the flexibility that duplicity adds to your backups. You can use the same setup, indipendant of your backup medium.
Let me know in the comments below if you are interessted in another article about restoring from your duplicity backup!